 Scrap Kit by Randy's Sin at
called Days of Summer
Template by www.blissfullybeth.blogspot.com

 This is my own Creation using Randy's Scrap kit www.randyssin.blogspot.com and Template by Vix at www.vixpsp.blogspot.com


Things are a little out of sorts here at home. I am going to take a break for just a bit, while I get my house and life in order. Thank You for being faithful to my blog.
 This tutorial was written on March 31st, 2010. This is my own creation using Tootypups Easter Dawn. Please do not copy this tutorial in any way.
 This tutorial was written on March 31, 2010. This is my own creation using kit Pink Lemonade by Tasmin McAtee Studios. Please do not opy in any way.
 This tutorial was written by me, on March 31, 2010. This is my own creation using Stina's Scrap kit Flutterfly Fae. Any resemblence is only coincidental. Please do not copy this tutorial in any way.
 I wrote this tutorial on Feb. 28th, 2010. This is my own creation using scrap kit by Tootypup and Template by me. Please do not copy or claim this tutorial in anyway.
 I wrote this tutorial on Feb. 28th, 2010. This is my own creation using scrapkit Scrap Stone by MizzKitten @ Kreative Kreations Korner. Please do not copy this tutorial in anyway.
  ~Merge Group
 I wrote this tutorial on Feb. 28th, 2010. This is my own creation using scrapkit Pretty Panda by Carol's Crafty Corner @Dazzling Scraps.
~Open New 800x800 Image, floodfill white.
~Copy paper 9 and paste, resize 20%.
~Apply Mask = Layers>Load/savemask>Load Mask from disk. Merge Group.
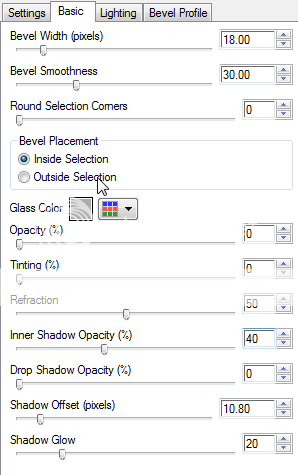
~Add DS 1, -1, 50, 5.00, black.
~Copy frame1 and Paste, resize 20%
~Using Magic Wand click inside each frame
~Selections>Modify>Expand 6
~Copy Paper 10 and Paste, resize 15%
Selections>Invert, delete. Ctrl + D, move below the frame.
~Using Magic Wand click inside top left frame.
Selections>Modify>Expand 6
~Copy Panda 1 and Paste, resize 15%.
Selections>Invert, delete. Ctrl +D Add DS.
~Do the same with the other 2 frames, using Panda 3 & 5.
~Merge Layers 4, 5 & 6 together.
~Move below the frame.
~Change Blend Mode of the Panda's to Luminance(L), lower Opacity to 74.
~Add DS to Frames
~COpy Flower1 and Paste, Resize 70%.
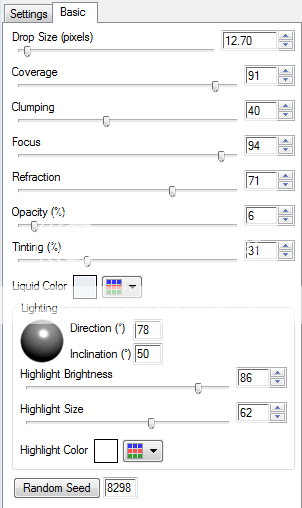
~Apply Mura's Copies with the Following Settings.

 ~Move this layer above your mask layer. Add DS
 This tutorial was written on Feb. 21St. 2010. This is my own creation using scrap kit by Stina "Ladybird Love" and Template by Toxic Desirez.
 I wrote this tutorial on Feb. 20th, 2010. This is my own creation, using Scrap kit Lovingly Yours by Lady Raven. Any resemblence is only coincidental. Please do not copy, this tutorial in anyway.
 ~Merge Group.
 ~Using Magic wand, click inside frame.
 This tutorial was written on Feb. 7th, 2010. This is my own creation using Celtic Dreams kit by Randy's Sin. Any resemblence is only coincidental. Please do not copy this tutorial in anyway.
 This tutorial was written on Feb. 4, 2010. This is my own creation, using an outside Template and Scrapkit. Any resemblence is only coincidental. Please do not copy, this tutorial in anyway.
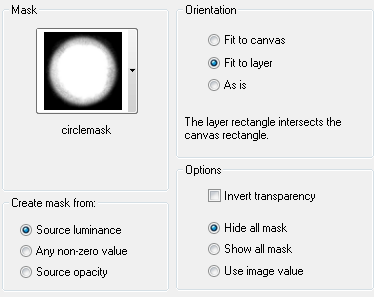
 This Tutorial was written on Feb. 5th, 2010. This is my own creation, using Template by Elegantly Wasted and Scrap Kit by Baby Cakes Scraps.
 This tutorial was written on Jan. 29th 2010. Little Late posting. Please do not copy this tutorial in any way.
 ~Do the Same the same, with the swirls of the frame. Using Paper 10.
 This tutorial was written by me, on Jan. 26th, 2010. This is my own creation, using Scrap kit by Brandie's Eye Candy. Please do not copy this in anyway.
 ~X out Mask1 and Un X Mask2 and Change Random Seed. Apply to Mask2.
 This tutorial was written on, Jan. 22, 2010. This is my own creation using Template by Toxic Desire and Scrap kit by Wicked Princess.
 Thank You for Trying my tutorial.
 This Tutorial was written on Jan. 20th, 2009. This is my own creation. Any resemblences is only coincidental. Please do not copy this tutorial in anyway.
 This tutorial was written by me, on Jan. 20th, 2010. This is my own creation Using kit Laissez Les Bon Temps Rouler by Randy's Sin. Please do not copy this tutorial in anyway.

 This tutorial was written by me, on Jan. 12th, 2010. This is my own creation, using Template by Missy & Rachel @ Divine Intentions and Scrap kit by Lady Raven @ Dazzling Scraps Store. Please do not copy this tutorial in any way.


 BettyFreakStyle@yahoo.com. If you have any ?'s or concerns, about any of my tutorials, please contact me.
Thank You
BettyFreakStyle@yahoo.com. If you have any ?'s or concerns, about any of my tutorials, please contact me.
Thank You


