Showing posts with label Pampered Pups CT. Show all posts

Wednesday, March 31, 2010

He Is Risen

This tutorial was written on March 31st, 2010. This is my own creation using Tootypups Easter Dawn. Please do not copy this tutorial in any way.
◘
§ Supplies §
•
♦ PSP 9 any version will do
♦ mask & Jesus Mist HERE
♦ PTU kit by Tootypup Easter Dawn HERE
◘
§ Lesson §
•
~Open new 800 x 800 image, floddfill white.
~Copy Paper 3 and paste, resize 70%.
~Appy mask, merge group and add DS of choice.
~Copy easter dawn 7 and paste, resize 60%, add DS.
~Copy Jesus mist and paste, resize 80%.
~Copy He has risen 1 and paste, resize 35%, add DS.
~Add Name and copyright.
~crop & resize 399 x 384 px.
~Save as .png.

Sunday, February 28, 2010

Beautiful Fantasy

I wrote this tutorial on Feb. 28th, 2010. This is my own creation using scrap kit by Tootypup and Template by me. Please do not copy or claim this tutorial in anyway.
◘
§ Supplies §
•
♦PSP 9, any newer version will do.
♦Template HERE
♦PTU Scrapkit Living In a Dream by Tootypup HERE
◘
§ Notes §
•
This tutorial assumes you have a working, knowledge of PSP and all its supplies.
◘
§ Lesson §
•
~Open Template, delete copyright.
~Go to Mask layer
Selections>Select All>Float>Defloat.
~Copy Paper 9 and Paste, resize 80%
Selections>Invert, delete. Ctrl + D and delete Mask Layer.
~Go to Lines
Selections>Select All>Float>Defloat
~Copy Paper5 and Paste, resize 80%
Selections>Invert, delete. Ctrl + D, add DS 0, 0, 70, 7.00 Black
Delete Lines
~Go to Doodle
Selections>Select All> Float>Defloat
~Copy Paper8 and Paste, resize 80%
Selections>Invert, delete. Ctrl + D, add DS and Delete doodle.
~Go to SmLeftCircle
Selections>Select All>Float>Defloat
~Copy paper13 and Paste.
Selections>Invert, delete. Ctrl + D, add DS and Delete SmLeftCircle.
~Do the Same for the SmRightCircle, using same paper.
~Do the same for LgCircle, using paper 2.
~Copy angel4 and Paste, resize 70%, add DS.
~Copy Rainbow1 and Paste, resize 70%, Move this layer under the angel layer.
~Add Name & Copyright
~Crop, resize and Save as .png

Sunday, February 21, 2010

You Are Beautiful

This tutorial was written on Feb. 21St. 2010. This is my own creation using scrap kit by Stina "Ladybird Love" and Template by Toxic Desirez.
◘
§ Supplies §
•
♦PSP 9 (any newer version will do)
♦Template 63 by Toxic Desirez HERE
♦PTU Scrap Kit Ladybird Love by Stina HERE
♦Gradient Glow by Alien Skin HERE
♦Font of Choice, font I am using is Scarlet Ribbons
♦Poser Tubes included in the Kit
◘
§ Notes §
•
This tutorial assumes you have a working, knowledge of PSP.
◘
§ Lesson §
•
~Open Temp.
Duplicate
Delete Copyright
Delete Original
~Resize Canvas
Image>Canvas Size
800x800
*Start at Bottom*
•
~ Thin Rectangle
Selections
Select All
Float
Defloat
•
~Copy Paper21 and Paste
Resize 72%
Selections
Invert
Delete
Ctrl + D
Add DS
7, -3, 75, 5.00, Black
Delete Thin Rectangle
•
~Dotted Lines
Selections
Select All
Float
Defloat
•
~Add New Raster Layer
Floodfill #dcc4ad
Ctrl + D
Delete Dotted Lines
•
~Flower
Selections
Select All
Float
Defloat
•
~Copy Paper 04 and Paste
Resize 72%
Selections
Invert
Delete
Ctrl +D
Add DS
Delete Flower
•
~Rectangle
Selections
Select All
Float
Defloat
•
~Copy Paper25 and Paste
Resize 70%
Selections
Invert
Delete
Ctrl + D
Delete Rectangle
•
~Sm. Rectangle
Selections
Select All
Float
Defloat
•
~Copy Paper 28 and Paste
Resize 70%
Selections
Invert
Delete
Ctrl + D
Add DS
0, 0, 75, 5.00, black
Delete Sm. Rectangle
•
~Frame
Selections
Select All
Float
Defloat
•
~Copy Paper 26 and Paste
Resize 70%
Selections
Invert
Delete
Ctrl + D
Add DS
Delete Frame
•
~Dotted Rectangle
Selections
Select All
Float
Defloat
•
~Add New Raster Layer
Floodfill with Black
Delete Dotted Rectangle
•
~Delete Doodles
•
~Words
Selections
Select All
Float
Defloat
•
~Copy Paper01 and Paste
Selections
Invert
Delete
Add DS
Add Gradient Glow
(Optional, this effect can be done with DS using White 0,0, 100, 20.00)
•
~Copy LadybirdLove01 (poser) and Paste
Resize 40%
Add DS 7, -3, 75, 5.00 white
Move to the Left
•
~Copy Rose10 and Paste
Resize 50%
Place above raster layer 3
•
~Copy HeartTree02 and Paste
Resize 50%
Place below the words
Add DS
•
~Copy Different colored lady bugs, love bugs, butterflies and apples
•
*Resizing for Each*
Ladybug, lovebug, loverfly & butterfly 5%
Place all over the leaves of the tree
Apple 10%
Duplicate Apple 4 times and place on leaves.
•
~Add Name and Copyright
Crop
Merge Visible
Resize
Save as .png
Thank You for Trying my Tutorial

Saturday, February 6, 2010

Now I lay Me Down

This tutorial was written on Jan. 29th 2010. Little Late posting. Please do not copy this tutorial in any way.
◘
§ Supplies §
•
♦PSP 9 (any newer version will do)
♦PTU Scrap kit The Prayer by Tootypup HERE
♦EyeCandy 5 Glass HERE
♦Mask of Choice
♦Word Art HERE
◘
§ Notes §
•
This tutorial assumes you have a working knowledge of PSP.
◘
§ Lesson §
•
~Open a New 800x800 Transparent Image and floodfill white.
~Copy Cameoframe1 and Paste, resize 60%. Using Magic wand, click inside the outer part of frame. Selections>Modify> Expand2.
~Copy Paper15 and Paste, resize 70%. Selections> Invert, delete. Ctrl + D, move under frame.
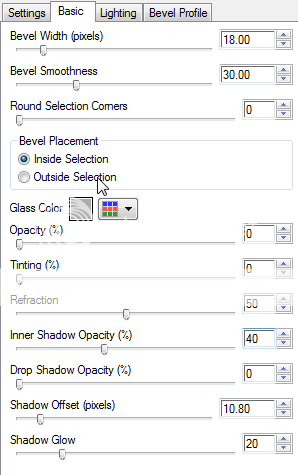
~Add EyeCandy Glass. Use the following settings (Choose Clear, No drop Shadow).

~Do the Same the same, with the swirls of the frame. Using Paper 10.

~Merge Down with other paper layer. After applying Glass effect, lower Opacity to 80.

~This will give a stained glass look.

~Add Drop Shadow to Frame 0, 0, 40, 4.00.

~Copy Paper3 and Paste above background layer, resize 70%. Appy Mask, Merge Group.

~Duplicate, Mirror and flip.

~Copy Vine and Paste, resize 15%, Add DS. Move to the Right of frame.

~Copy Lordsprayer2 adn Paste, resize 25%. Using Raster Deform Tool, turn to the left slighty. Adjust>Sharpness>Sharpen. Add DS.

~Copy Leafdeco2 and Paste, Resize 50%, Move below the scroll.

~Copy Praying1 and Paste, resize 60%. Place above scroll.

~Copy Prayer4 and Paste, resize 60%. Duplicate, move this below the frame.

~On Orginal Poser erase the legs. DO the same with the duplicated. It will look like the legs are under the frame.

~Copy Word Art and Paste and Move above the Frame Layer.

~Put name and Copyright info.

~Crop and save as .png.

Thank You for trying my tutorial.

Wednesday, January 20, 2010

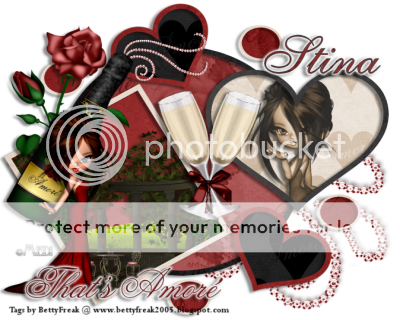
Love Is In The Air

This Tutorial was written on Jan. 20th, 2009. This is my own creation. Any resemblences is only coincidental. Please do not copy this tutorial in anyway.
•
Supplies:
♦PSP
♦PTU Scrap kit by Stina and Posers by ©Medi @ Designz by Stina HERE
♦FTU Template51 (half way down the page) by Ali @ Designs by Ali HERE
♦EyeCandy 5: Gradient Glow
•
Notes:
This tutorial assumes you have a working, knowledge of PSP.
•
Lesson:
~Open Temp51, duplicate and delete copyright.
~Use Freehand Selection Tool, set to Point to Point. Go around Black Rectangle Back.
~Selections>Modify> Expand by 3
~Copy Paper10 and Paste. Selections>Invert, delete Black Rectangle.
~Go to Circle Back and Selections>Select All>Float>Defloat.
~Copy Paper 29 and Paste, resize 60%. Selections>Invert, delete. Ctrl + D, Delete Circle Back.
~Go to Big Heart Back and Selections>Select All>Float>Defloat.
~Copy Paper 12 and Paste, resize 60%. Move into position. Selections>Invert, delete. Ctrl + D, delete Big Heart Back.
~Go to Inside Heart, Selections>Select All>Float>Defloat.
~Copy Paper11 and Paste, resize70%. Move into Position. Selections>Invert, delete. Ctrl + D, delete Inside Heart.
~Go to Small Circle Back. Selections>Select All>Float>Defloat.
~Copy Paper25 and Paste. Selections>Invert, delete. Ctrl + D, delete small circle frame.
~On all the frames. Work on one at a Time. Selections>Select All>Float>Defloat. Use different papers.
*Small Circle =Paper 22, add DS
*Heart Frame = Paper05, Add DS
*Big Heart Frame = Paper01, add DS
*Rectangle Frame = Paper07, add DS
*Circle Frame = Paper16, add DS
~Selections>Invert, delete. Ctrl + D. Delete small circle, Heart Frame, Big Heart Frame, Rectangle Frame and Circle Frame.
~Copy Bling1 and Paste. Resize 70%. Move to the Bottom.
~Copy ChampagneGlass1 and Paste, resize 30%, add DS.
~Copy Champagne and Paste, resize 45%, Free Rotate 30 right. Adjust>Sharpness> Sharpen, Add DS.
~Copy Blong02 and Paste, resize 20%. Move under the champange bottles top at pour spout.
~Copy Rose01 and paste, resize 50%. Move under Chamapgne, add DS.
~Go to Lg. Red Rectangle. Selections>Select All>Float>Defloat.
~Copy Garden02 and Paste, resize 50%. Move Down. Selections> Invert, delete. Ctrl + D, Add DS.
~Go to White heart background. Selections>Select All>Float>Defloat.
~Copy Poser1 and Paste, resize 50%. Selections>Invert, delete. Ctrl + D, add DS.
~Change Blend Mode to Luminance, Opacity to 80.
~Copy Poser2 and Paste, resize 40%. Mirror and Add DS.
~Copy Word Art02 and Paste, resize 30%. Add Gradient Glow and add DS.
~Add New Layer and Floodfill white, move to the bottom.
~Add Copy from Poser Tube
~Add Your name and Copyright into.
~Resize 400x310 px, save as .png.
Thank You for trying my Tutorial.