Sunday, February 28, 2010

Pretty Panda

I wrote this tutorial on Feb. 28th, 2010. This is my own creation using scrapkit Pretty Panda by Carol's Crafty Corner @Dazzling Scraps.
◘
§ Supplies §
•
♦PSP 9, any newer version will do.
♦PTU scrapkit Pretty Panda by Carol's Crafty Corner @ Dazzling Scraps HERE
♦Mura Meisters Copies HERE
♦Mask and Wordart HERE
◘
§ Notes §
•
This tutorial assumes you have a working, knowledge of PSP and plugins/filters. All drop shadows will be 1, -1, 50, 5.00, black.
◘
§ Lesson §
•

~Open New 800x800 Image, floodfill white.

~Copy paper 9 and paste, resize 20%.

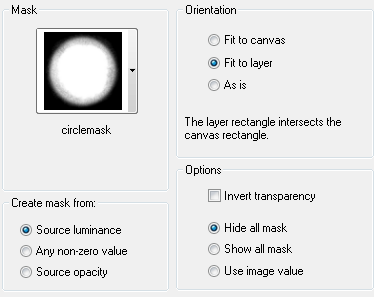
~Apply Mask = Layers>Load/savemask>Load Mask from disk. Merge Group.

~Add DS 1, -1, 50, 5.00, black.

~Copy frame1 and Paste, resize 20%

~Using Magic Wand click inside each frame

~Selections>Modify>Expand 6

~Copy Paper 10 and Paste, resize 15%

Selections>Invert, delete. Ctrl + D, move below the frame.

~Using Magic Wand click inside top left frame.

Selections>Modify>Expand 6

~Copy Panda 1 and Paste, resize 15%.

Selections>Invert, delete. Ctrl +D Add DS.

~Do the same with the other 2 frames, using Panda 3 & 5.

~Merge Layers 4, 5 & 6 together.

~Move below the frame.

~Change Blend Mode of the Panda's to Luminance(L), lower Opacity to 74.

~Add DS to Frames

~COpy Flower1 and Paste, Resize 70%.

~Apply Mura's Copies with the Following Settings.


~Move this layer above your mask layer. Add DS

~Copy Flower2 and Paste, resize 40%.

~Apply Mura's Copies with same settings. Add DS, move this above flower1 layer.

~Copy bow3 and Paste, resize 25%. Add DS and move to Bottom of frames.

~Copy Panda 4 and Paste, resize 25%. Add DS, move to the Bottom of the frame.

~Copy wordart from supploes and Paste.

~Add Name and Copyright info.

~Resize and save as .png

Sunday, February 21, 2010

Bad Girl

This tag was made using FTU "His Sinful Ange"l by Scraps by Randy's Sin.
You can find this kit HERE. Kit will be available soon.

You Are Beautiful

This tutorial was written on Feb. 21St. 2010. This is my own creation using scrap kit by Stina "Ladybird Love" and Template by Toxic Desirez.
◘
§ Supplies §
•
♦PSP 9 (any newer version will do)
♦Template 63 by Toxic Desirez HERE
♦PTU Scrap Kit Ladybird Love by Stina HERE
♦Gradient Glow by Alien Skin HERE
♦Font of Choice, font I am using is Scarlet Ribbons
♦Poser Tubes included in the Kit
◘
§ Notes §
•
This tutorial assumes you have a working, knowledge of PSP.
◘
§ Lesson §
•
~Open Temp.
Duplicate
Delete Copyright
Delete Original
~Resize Canvas
Image>Canvas Size
800x800
*Start at Bottom*
•
~ Thin Rectangle
Selections
Select All
Float
Defloat
•
~Copy Paper21 and Paste
Resize 72%
Selections
Invert
Delete
Ctrl + D
Add DS
7, -3, 75, 5.00, Black
Delete Thin Rectangle
•
~Dotted Lines
Selections
Select All
Float
Defloat
•
~Add New Raster Layer
Floodfill #dcc4ad
Ctrl + D
Delete Dotted Lines
•
~Flower
Selections
Select All
Float
Defloat
•
~Copy Paper 04 and Paste
Resize 72%
Selections
Invert
Delete
Ctrl +D
Add DS
Delete Flower
•
~Rectangle
Selections
Select All
Float
Defloat
•
~Copy Paper25 and Paste
Resize 70%
Selections
Invert
Delete
Ctrl + D
Delete Rectangle
•
~Sm. Rectangle
Selections
Select All
Float
Defloat
•
~Copy Paper 28 and Paste
Resize 70%
Selections
Invert
Delete
Ctrl + D
Add DS
0, 0, 75, 5.00, black
Delete Sm. Rectangle
•
~Frame
Selections
Select All
Float
Defloat
•
~Copy Paper 26 and Paste
Resize 70%
Selections
Invert
Delete
Ctrl + D
Add DS
Delete Frame
•
~Dotted Rectangle
Selections
Select All
Float
Defloat
•
~Add New Raster Layer
Floodfill with Black
Delete Dotted Rectangle
•
~Delete Doodles
•
~Words
Selections
Select All
Float
Defloat
•
~Copy Paper01 and Paste
Selections
Invert
Delete
Add DS
Add Gradient Glow
(Optional, this effect can be done with DS using White 0,0, 100, 20.00)
•
~Copy LadybirdLove01 (poser) and Paste
Resize 40%
Add DS 7, -3, 75, 5.00 white
Move to the Left
•
~Copy Rose10 and Paste
Resize 50%
Place above raster layer 3
•
~Copy HeartTree02 and Paste
Resize 50%
Place below the words
Add DS
•
~Copy Different colored lady bugs, love bugs, butterflies and apples
•
*Resizing for Each*
Ladybug, lovebug, loverfly & butterfly 5%
Place all over the leaves of the tree
Apple 10%
Duplicate Apple 4 times and place on leaves.
•
~Add Name and Copyright
Crop
Merge Visible
Resize
Save as .png
Thank You for Trying my Tutorial

Saturday, February 20, 2010

Princess Gorguss

I wrote this tutorial on Feb. 20th, 2010. This is my own creation, using Scrap kit Lovingly Yours by Lady Raven. Any resemblence is only coincidental. Please do not copy, this tutorial in anyway.
◘
§ Supplies §
•
♦PSP 9, (any newer version will do)
♦Tube of Choice. I used the Artwork of Suzanne Wolcott. You can purchase a license and the tube for one low price (do not use without license) HERE
♦PTU scrap kit Lovingly Yours by Lady Raven at Kreative Kreations HERE
♦Temp 5 by Toxic Desirez (scroll down, it will be on the right hand side under Templates) HERE
♦Font of Choice (not sure which one I used)
◘
§ Notes §
•
This tutorial assumes you have a working, knowledge of PSP.
◘
§ Lesson §
•
~Open Template, duplicate and close original.
Resize Canvas=Image>Canvas Size
800x800, floodfill white
Delete Copyright.
~On Lg. Rect. Selections>Select All>Float>Defloat.
~Copy Paper02 and Paste, resize 60%. Selections>Invert, delete. Add DS 0, 0, 75, 10.00, Black.
Ctrl + D, Delete Lg. Rect.
~Do the same for Med. Rect. using Paper 09 and Sm. Rect. using Paper 13.
~On Crown Do the Same, using Paper 01.
~Delete Dotted lines and SM. Hearts.
~On Princess Selections>Select All>Float>Defloat.
~Add New Raster Layer and floodfill with #ddbc4b. Ctrl + D, add DS & Delete Princess.
~Copy Flower 1 and Paste, resize 50%, Add DS and move to the Right.
~Copy FLourish3 and Paste, resize 70%. Move this above the Background layer.
~Copy Button3 and Paste, resize 10%, add DS. Move abouve Rectangle layers.
Duplicate the Button 3 times 9you should now have 4.
Put one in each corner.
~Copy Tree and paste, resize 30%, add DS, changing Blur to 5.00.
~Copy Tube and Paste, I resized my tube 70%, add DS. Make sure its under the princess word.
~Add Name, Copyright info., Crop and Merge Visible.
~Resize 400x300px and save as .png.
Thank You for trying another one of my Tutorials

Love You Always


I worte this tutorial on Feb. 20th, 2010. This is my own creation suing I Don't Give a Scrap's "Dozen Roses". Any resemblence is only coincidental. Please do not copy this tutorial in anyway.

◘

§ Supplies §

•

♦PSP 9 (any newer version will do)

♦Animation Shop

♦PTU Scrap kit "Dozen Roses" by I Don't Give a Scrap @ Kreative Kreations HERE

♦Font Al Sandra HERE

♦Mask, Tube & Bling HERE

◘

§ Notes §

•
This tutorial assumes you have a working, knowledge of PSP and AS. All Dropshadow settings will remain the same 4, -1, 75, 5.00, Black.

◘
§ Lesson §
•
~Open New Image 800x800, floodfill with white.

~Copy Paper 2 and Paste, resize 70%.
~Apply Mask= Layers>Load/Save Mask> Load from Disk. You settings below.

~Merge Group.

~Copy Wood Frame and Paste, resize 60%.

~Free Rotate= Image>Rotate>Free Rotate, use settings below.

~Using Magic wand, click inside frame.

~Expand=Selections>Modify>Expand 5.

~Copy Paper13 and Pastre, resize 80%. Selections>Invert, delete. DO NOT Deselect. Move this layer below the frame.

~Selections>Invert.

~Copy Tube and Paste, resize 60%. Selections> Invert, delete. CTRL + D.

~Add DS to frame.

~Copy HeartString and Paste, resize 40%, place in top left of frame. Add DS.

~Copy rosebunch and Paste, resize 40% and Add DS. Move to the lower right of frame.

~Copy Pods and Paste, move under the HeartDtring, resize 40%, Add DS.
~Add Name and Copyright Info. Merge Visible.

~Crop, if not animating resize 400x400px and save as .png.
◘
§ Animation §
•
~Copy and Paste in AS.

~Hold down Ctrl and click L 11 times. So you will have 12 Frames.


This will show in the bottom Right Corner.

~Ctrl + A

~Open your bling and Ctrl + A

~Using Your mouse click and hold. Drag bling to your tag and Place were you want it. This is trial and error.

~Resize 397x406

~Save and your done.

~Thank you for trying another one of my Tutorials.

Sunday, February 7, 2010

Lucky

This tutorial was written on Feb. 7th, 2010. This is my own creation using Celtic Dreams kit by Randy's Sin. Any resemblence is only coincidental. Please do not copy this tutorial in anyway.
◘
§ Supplies §
•
♦PSP 9 (any newer Version will do)
♦FTU Scrap kit Celtic Dreams by Randy's Sin HERE
♦Template25 by Toxic Desirez HERE
♦Tube Pattys No Saint ©SheilaCraig at Voodoo HERE
◘
§ Notes §
•
This tutorial assumes you, have a working knowledge of PSP. All Dropshadow settings will remain the same 0, 0, 75, 5.00, black.
◘
§ Lesson §
•
~Open Template, duplicate, delete copyright and close original.
~Resize Canvas 800x800.
~Go to Clovers1. Selections> Select All>Float>Defloat.
~Copy Paper13 and Paste, resize 30%. Selections>Invert, delete. Ctrl + D, add DS. Delete CLovers1.
~Go to Clovers2, do the same as above using Paper3.
~Do the same to Large Clover, using Paper10 and resizing 20%.
~Do the same to Word art using Paper7.
~Copy Shamrock5 and Paste, resize 50%, add DS.
~Copy Pot of Gold and Paste, resize 20%, add DS.
~Copy Hat3 and Paste, resize 20%. Free rotate 30.00 Left, add DS.
~Copy Claddaugh and Paste, resize 10%. Add DS, move below the Hat and Pot of Gold.
~Copy Tube and Paste, resize 60%. Add DS.
~Copy Wordart17 and Paste, resize 20%.
~Erase part of the word, so it looks like its behing the tubes, boot. Add DS to Wordart.
~Add Name and Copyright Info.
~Crop, resize 400x400px and save as .png

Spring Is Here

This tutorial was written on Feb. 4, 2010. This is my own creation, using an outside Template and Scrapkit. Any resemblence is only coincidental. Please do not copy, this tutorial in anyway.
◘
§ Supplies §
•
♦PSP 9 (any newer version will do)
♦Temp. 39 by WickedScraps at Toxic Desire HERE
♦PTU Scrapkit "Wishing for Spring" by Dani @Dazzling Scraps HERE
♦FTU Hellonlegs Tube Mary Mary T-shirt HERE
♦Mask HERE
♦FTU Font Chick HERE
♦AlienSkin EyeCandy Gradient Glow HERE
◘
§ Notes §
•
All Dropshadow settings, will remain the same 2, -3, 75, 5.00, Black. This tutorial assumes, you have a working knowledge of PSP.
◘
§ Lesson §
•
~ Open template, duplicate & delete original. Delete copyright & Resize Canvas 800x800.
~Go to Background layer
~Copy Paper 17 and Paste, resize 70%.
~Apply mask, Layers>Load/SaveMask>Load from Disk, with Settings below. Merge Group.
~ Merge Down Leaf 2 and Leaf 1, Do the Same with Leaf 4 and Leaf 3.
~Go to Leaf1. Selections>Select All>Float>Defloat.
~Copy Paper 11 and Paste, resize 70%.
~Selections>Invert, delete. Ctrl + D, Add DS, delete Leaf 1.
~Do the same with Leaf 3, using Paper 10.
~Go to FlowerFill. Selections>Select All>Float>Defloat.
~Copy Paper 15 and Paste, resize 70%.
~Selections>Invert, delete. Ctrl + D, delete FlowerFill.
~Go to Flower Frame. Selections>Select All>Float>Defloat.
~Copy Paper2 and Paste, resize 50%.
~Selections>Invert, delete. Ctrl + D, add DS, Delete FlowerFrame.
~Go to Words. Selections>Select All>Float>Defloat.
~Copy Paper12 and Paste.
~Selections>Invert, delete. Ctrl + D, Add Gradient Glow & DS. Delete words.

~Copy Flower Decoration 3 and Paste, add DS.
~Copy Butterfly 1 and Paste, resize 50%. Lower Opacity to 82.
~Copy Dragonfly 3 and Paste, resize 50%.
~Copy Tube and Paste, add DS.
~Add Name and Copyright Info.
~Crop, resize 400x400px and save as a .png.