Wednesday, January 20, 2010

New Award

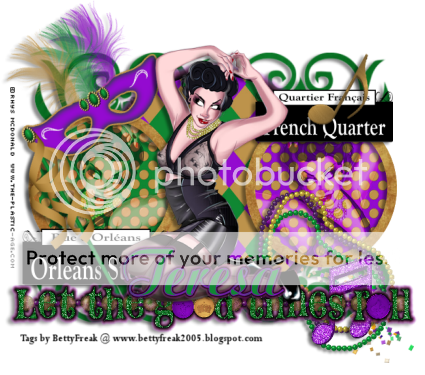
New Award I have received, Thank You, Teresa (Scraps by Randy's Sin):
Passing Along this Great Award, to some Great Blogs:


Let The Good Times Roll

This tutorial was written by me, on Jan. 20th, 2010. This is my own creation Using kit Laissez Les Bon Temps Rouler by Randy's Sin. Please do not copy this tutorial in anyway.
•
Supplies Needed:
♦PSP
♦Eye Candy 5: Gradient Glow
♦FTU Template 2 by Babe's Designz HERE
♦FTU Scrap kit Called Lasissez Les Bon Temps Rouler @ Scraps by Randy's Sin HERE
♦Tube by Rhys McDonald (I will provide, please use copyright info) HERE
•
Notes:
This tutorial assumes you have, a working knowledge of PSP.
•
Lesson:
~Duplicate Temp, Delete Copyright.
~Large Circle, Selections>Select All>Float>Defloat.
~Copy Paper10, Paste, Resize 70%. Selections>Invert, delete, Ctrl + D.
~Add Gradient Glow with Following Settings.
~Delete Large Circle.


~On Doodle, do the same as above, But don't add the Gradient Glow. Using Paper2 and Adding DS 3, -6, 45, 6.00. Delete Doodle.

~On Small Circle 1. Selections>Select All>Float>Defloat.
~Copy Paper 12 and Paste. Selections>Invert, delete. Ctrl + D, delete small circle 1.
~Do the same for small circle 2, but use paper11. Making sure to delete small circle 2, once done.

~Merge Together Natural Frame 1 & 2.
~Selections>Select All>Float>Defloat.
~Copy Paper6 and Paste. Selections>INvert, delete. Ctrl + D, Add DS, delete Natural Frames.

~You should have 5 Raster layers & Background.

~Select raster 3 in layer palette. Selections>Select All>Float>Defloat.
~Copy Tube and Paste (no resizing). Selections>Invert, delete. Ctrl + D, Duplicate and Mirror duplicated. Move both above Raster 4. Add DS to both. Merge Together, these 2 layers.

~In Layer Palette, change the Blend Mode to Hard Light and Opacity to 60.

~Now to Add embellishments.

USING (look at mine for placement):
~Beads4, resize 30%, Add DS.
~Mask1, resize 60%, free rotate 30 to the left, add DS.
~MusicNote3, resize 20%, free rotate 30 to the right, add DS.
~MusicNote5, resize 20%, add DS.
~FrenchQuarter, resize 30%, Move between Raster 5 & 7, add DS.
~OrleansStreet, resize 25%. Add DS.
~Glitter1, resize 50%. Move below Raster 1.
~WordArt5, resize 20%. Add Gradient Glow, changing Glow Radius to 8.00, add DS.
~Add Tube, resize 80%, Add DS.

◘
Add Name & Copyright. Merge , resize 425 x 375px and save as .png

Thank you for trying my Tutorial.

Tuesday, January 12, 2010

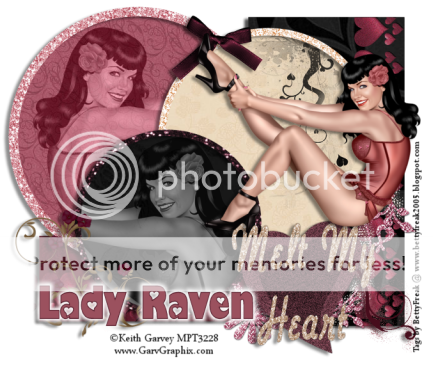
Melt My Heart

This tutorial was written by me, on Jan. 12th, 2010. This is my own creation, using Template by Missy & Rachel @ Divine Intentions and Scrap kit by Lady Raven @ Dazzling Scraps Store. Please do not copy this tutorial in any way.
◘
Supplies Needed:
♦FTU Temp6 Missy&Rachel Collab at Scraps of Enchantment HERE
♦PTU Scrap kit called Melt My Heart by Lady Raven Creations HERE
♦Tube of choice. I using a PTU Tube by ©Keith Garvey HERE
◘
Notes:
All Drop shadow settings will remain the same. This tutorial assumes you have a working knowledge of PSP.
◘
Lesson:
~Open Temp, duplicate and delete original.
~Delete copy right.
•
~Rectangle 1, Selections>Select All>Float>Defloat.
~Copy Paper04 and Paste as a New Layer. Selections>Invert, Delete. Ctrl + D, Add DS 3, -6, 45, 6.00, Black. Delete Rectangle 1.
~Do the Same with Rectangle 2, but use Paper20.
•
~On BlueSwirlBrush, Selections>Select All>Float>Defloat. Add New Raster Layer.
~Change Foreground and Stroke to #9b515e. Floodfill this new layer 3 times. Ctrl + D, Delete Blue Swirl Brush.
~BlackSwirlBrush, Selections>Select All> Float>Defloat. Add New Raster Layer.
~Change Foreground and Stroke to #470d1c, floodfill this new layer. Ctrl + D, Delete BlackSwirlBrush.
•
~On Pink Circle, Selections>Select All>Float>Defloat.
~Copy Paper10 and Paste as a New Layer. Selections>Invert, Delete.
~Ctrl + D, Delete Pink Circle.
~Do this for Blue Circle, using Paper06 and Black Circle, using Paper16
•
~Open GlitterTile 1, 2 & 3, Minimize these.
~On Large Frame, Selections>Select All>Float>Defloat. Add New Raster Layer.
~Click on Foreground and Stroke. CLick on the Patterns Tab and Find Glitter Tile 2. Change the Angle to 60 and Scale to 67.
~Floodfill this New layer. Ctrl + D, Delete Large Frame.
~Do the Same for the other 2 frames, Mkaing sure you add a New Rater Layer for both.
~On Med. Frame use Glittertile 3 and Small Frame use GlitterTile 1.
•
~On Brush1, Selections>Select All>Float>Defloat.
~Copy Paper05 and Paste as a New Layer. Selections>Invert, delete.
~Delete Brush1 and Move the one we just did below the glittered frame.
~Drop shadow all glitter Frames
•
~Delete the word love and the Heart. Delete Small Heart 1 & 2, also Heart 1 & 2.
•
~Now lets add some embellishments then the tube.
~Open Border1 and Duplicate it Twice, resize both 20%. Close the original.
~On the first one go to image>Free Rotate>Left 90, Copy.
~Click on the Black Rectangle, Selections>Select All>Float>Defloat. Paste Border and Move to the outer edge of Rect., Selections> Invert, delete.
~Copy the other Border and do the Same with the Pink Rectangle.
•
~Make sure Your back at the top of layer palette.
~Copy flower doodle2 and Paste, resize 30%. Move to the left of bottom circle.
~Copy flower doodle3 and Paste, resize 70%, move this layer below the cirlces.
~Copy wordart4 and paste, resize 40%. Place to the Bottom right.
~Add DS to all.
•
~On top Left circle, Selections>Select All>Float>Defloat.
~Copy Tube and Paste as a New Layer. Selections>Invert, delete.
~Change Blend Mode to Luminance (L) and Opacity to 58.
~Do the same with bottom Black Circle.
~Add Tube one more time, resizing if needed and move to top. Add DS.
•
~Add Name and Copyright info.
~Merge visible
~Crop is needed
~Resize 433x382 px.
Thank You for Trying this Tutorial


Wednesday, December 23, 2009

Gorgeous Blog Award


Many thanks to Ziggy at "ZiggyFan Scrap Designs"

for nominating me for this Award!

Be sure to check out her blog...she has some great scrap kits.

The rules are very simple:

Put the name and link of who gave you this award on your blog.

Then pass it on to 5 blogs which you think are AWESOME.

~Designed by Stina~

~Angel's Designz~

~Creative Misfits Creations~

~Lacarolita's Designz~

~Vix PSP~

Thank You for Visiting my Blog and I hope you enjoy..My Blog and Tutorials.

Vicki

Key To My Heart

This tutorial was written on Dec. 23rd, 2009. This is my own creation, Using Addictive Pleasure's Forbidden kit. Please do not copy this tutorial in anyway.
◘
Supplies Needed:
♦PSP I am using V.9, any version will do.
♦PTU Scrap kit called Forbidden by Addictive Pleasures HERE
♦FTU Template 35 by Babe's Designz HERE
♦FTU Font's Mary Monroe Script HERE & Popsies HERE
♦PTU Plugin Alien Skins Gradient Glow HERE (This can be achieved also with a DS, settings
0, 0, 70, 15.00, White)
◘
Notes:
This tutorial assumes, you have a working knowledge of PSP.
◘
Lesson:
Open Temp. 35, Duplicate, Delete Orginal. On duplicated temp., delete copyright.
~
Transmisson layer, Selections>Select All>Float>Defloat.
~
Copy Paper 10 and Paste as a New Layer. Selections> INvert, delete, Ctrl + D. Delete the transmisson layer.
~
Circle Layer, Selections>Select All> Float> Defloat.
~
Copy Paper 11 and Paste as a New Layer. Selections> INvert, delete, Ctrl + D. Add Gradient Glow with Following Settings.
~
Delete Circle.
~
Circle Line, Selections>Select All>Float>Defloat.
~
Copy Paper 7 and Paste as a New Layer. Selections> INvert, delete, Ctrl + D. Delete Circle Line.
~
Add Gradient Glow changing glow radiues to 5.00
~
Doodle Layer, Selections>Select All>Float>Defloat.
~
Copy Paper 2 and Paste as a New Layer. Selections>INvert, delete, Ctrl + D. Add DS, Delete Doodle.
~
Add Elements of Choice, May need to rotate some of the elements. Add DS, resizing will be necessary.
~
Add Name and Copyright info.
~
Resize 400x350, save as .png. Thank You for trying my tutorial.

Sunday, December 13, 2009

Glamorous


This Tag was made using a PTU Kit by Angel's Designz and Template 21 by Elegantly Wasted.

I Know You Want Me

I wrote this tutorial on Dec. 13th, 2009. This is my own creation, using a Template by Elegantly Wasted and Scrap Kit by Angels Designz. Please not copy this tutorial in any way.
◘
Supplies Needed:
♦PSP
♦Tube of Choice. I used the Artwork of ©Keith Garvey. You can purchase a License and the Tube at My PSP Tubes (do not use without the license) HERE
♦PTU Scrap Kit called Paparazzi by AngelsDesignz HERE
♦FTU Template EW0021 at Elegantly Wasted HERE
♦Word Art by Me HERE
◘
Notes:
This tutorial assumes you have a working knowledge of PSP.
◘
Lesson:
Open Template, Duplicate, delete copyright.
~
Resize Canvas (image> Canvas size) 725x725.
~
Floodfill white bg layer with more white.
~
Layer 10, Selections>Select All> Float> Defloat. Copy Paper6, Paste as a New Layer, Resize 50%, Selections>Invert, Delete. Ctrl + D. Add DS -2, -2, 50, 10.00, Delete Layer 10.
~
Layer 9, Selections>Select All> Float>Defloat. Copy Paper4, Paste as a New Layer. Selections>Invert, Delete. Ctrl + D. Add DS and Delete Layer 9.
~
Layer 8, Selections> Select All>Float>Defloat. Copy Paper18, Paste as a New Layer. Resize 50%. Selections>Invert, Delete. Ctrl+D. Add DS and Delete Layer 8.
~
Layer 6, Selections>Select All> Float>Defloat. Copy Paper12, Paste as a New Layer. Resize 70%. Selections> Invert, Delete. Ctrl+D. Add DS and Delete Layer 6.
~
Merge Down Layer 2 and 3. Click inside, both black rectangles. Copy Paper17, Paste as a New Layer. Resize 70%. Selections>Invert, Delete, Ctrl+D. Add DS and Delete Layer 3.
~
Delete Text & Text 2 Layers.
~
Copy Camera2, Paste as a New Layer. Place in the Middle of black star backgrounds, Add DS.
~
Copy High Heel, Paste as a New Layer, resize 50%. Add DS, place in Left bottom corner.
~
Copy Perfume, Paste as a New Layer, resize 30%, add DS. Place over High Heel.
~
Copy Word Art, Paste as a New Layer.
~
Copy Tube, Paste as a New Layer, over Left Black star Bg. Rize if Needed, Add DS.
~
Using Selection tool, set on Rectangle, draw around Right Black Star Bg.
~
Use Tube again. This time do not resize. Place over Right Black Star Bg. Selections>Invert, delete, Ctrl + D. Change to Luminance (L).
~
Add Name and Copyright Info.
~
Merge Visible and Crop
~
Resize 400x300 px
~
Save .png
Thank You for trying my Tutorial.